
 German
 Spanish
 French
 Italian
To seal damp walls in basements or storage rooms, hallways, garages, etc. from the inside does not require as much effort as you might think. Of course, the cause of the moisture damage should always be determined first, but when it comes to pushing the moisture out of the building structure and creating usable or habitable rooms again, a crystalline seal should definitely also be examined. Using the example of a basement renovation, we will show you the necessary work steps.
General notes in advance:
During the processing time and 72 hours afterwards, the substrate and material temperature must be at least +5°C, but not more than +30°C, the relative humidity should not exceed 80%. The treated surfaces must be protected from wind and sunlight from drying out too quickly.
The waterproofing slurry requires water as a catalyst for the crystallization process. The more water has been removed from the wall by previous drying of the moisture damage, the more must be added back by spraying or painting the wall.This also applies if the substrate is too absorbent.
The following steps must be taken when renovating a basement:
1. preparation
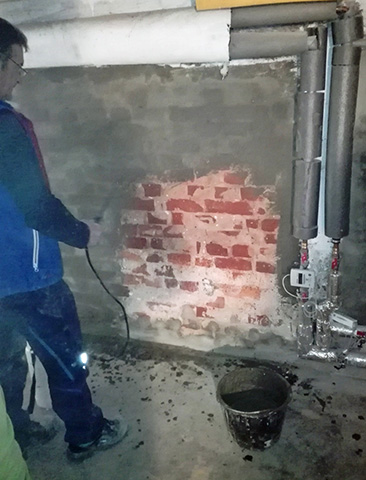
Removal of the old plaster, any contamination (eg, formwork oil residues, cement residues) and friable joints. Concrete surfaces to be treated must be open to pores. Nests or defects in the concrete must be levelled out with the slurry (preparation with less water) before applying the actual slurry. If necessary, AREXAL® liquid X can also be added to a mortar of mortar group II and used for filling. The same applies to crumbly joints, which must be caulked out to a depth of at least 3 cm until the joint no longer crumbles out. Any existing spacers, star spreaders, or rod wires should be mortised out to a depth of 1.5 - 2 cm and also filled with this cement mixture.
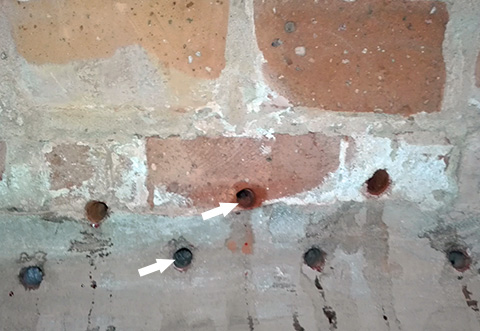
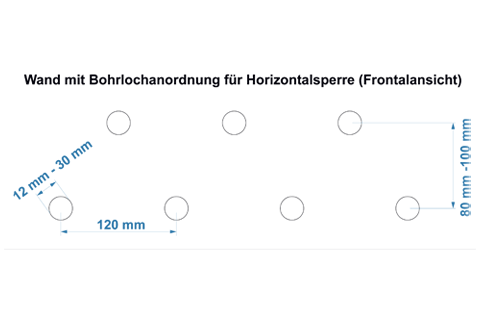
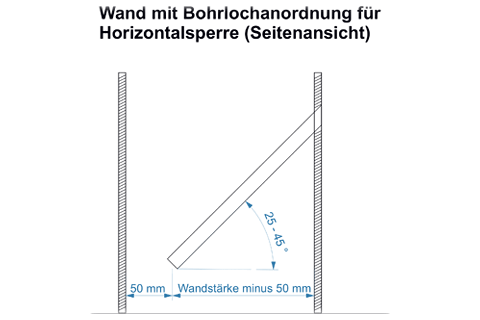
2. Setting the drill holes for horizontal barrier (if necessary)
For setting a horizontal barrier, 12 mm wide drill holes are set with a spacing of 12 cm. Either linearly in one row, or ideally in two staggered rows (see sketch). The borehole should be drilled at an angle between 25 and 45 from top to bottom. The depth of the hole depends on the wall thickness minus 5 cm. For walls thicker than 60 cm, drill holes should be placed on both sides of the wall. Backfilling with AREXAL® Injection Plus is done until saturation of the capillaries occurs (usually 2-3 passes) and can be done using a conventional garden sprayer without pressure. The boreholes should be blown out and possibly moistened before injection. The waiting time between each pass is 2-3 hours, but should not exceed 8 hours, and plastered over with the crystalline sealing slurry immediately afterwards. In the case of double-skin or multi-skin masonry, as well as in the case of cavities, pre-filling with laguz Injektion plus should be carried out in order to obtain a compact wall for the actual injection. As the liquid is highly corrosive, it is essential to wear protective goggles and gloves!
3. Grouting in expansion joints, cables and pipe penetrations
They must be mortared out to a depth of 1.5 cm and repointed using the sealing slurry to which the AREXAL® elastic slurry has been added, as expansion joints, cables and pipe penetrations always work a little and so only then will a crack-free surface be created. The elastic slurry prevents the growth of crystals in the sealing slurry, which is why this area must then be plastered over with the crystalline sealing slurry without additives. The elastic slurry is an additive and is simply mixed with the powder of the waterproofing slurry instead of water until the desired consistency is reached and must be applied within one hour, again with the substrate free of loose dust and grains. In the case of joint tapes, it is necessary to pre-paint the surface with a first coat before inserting the tape, and after inserting the tape, also paint its edges.
4. chiseling out a fillet between the wall and the floor (picture below)
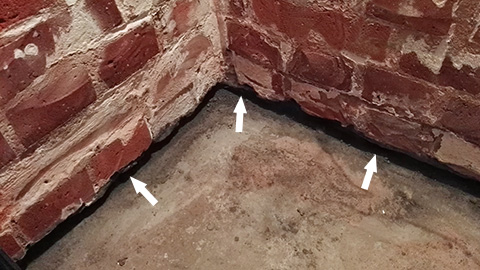
4.1 Press in the dry AREXAL® Express dicht powder into the cove, which must be moistened beforehand. (Gloves / mask necessary!)
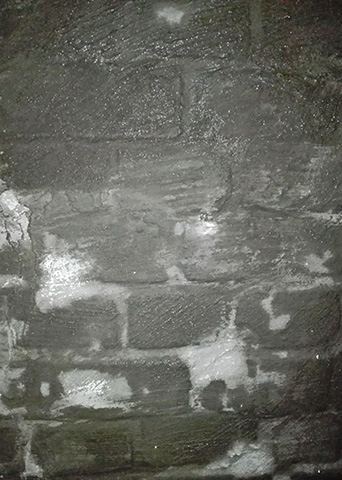
4.2 Paint sealing slurry over it (including about 5 cm up the wall and 5 cm on the floor). A 25 kg bag AREXAL® crystalline sealing slurry is to be mixed with approx. 5.5 l of water, the mixture must swell shortly before application. If you want to seal the wall against pressurized water, it is better to prepare the slurry with less water and to trowel the layers instead of applying with a tassel (see technical data). The coating must be applied on a damp surface, the waiting time between coats must be short (about 30 minutes or breakfast break length), so that there is still enough moisture for the next slurry coat, but the previous coat can dry a little. After that, the sealing slurry should be applied in a thinner consistency as a bonding primer, 2 to 3 coats are needed. The total thickness of the slurry layer should not be less than 2 mm. Any desired AREXAL® Restoration plaster white 30 kg can/must be applied immediately without waiting, as the slurry no longer accepts subsequently applied water for the adhesion of the Sanierputz after it has dried and the plaster adheres more heavily. Excess water not needed for crystal growth is forced out of the wall during the drying process and is a normal process (picture below). For brick masonry, it is recommended to chisel out the joints (about 2-3 cm deep) and re-grout with the sealing slurry before applying the slurry on the whole wall. If the slurry is not used but has set, it can be softened with water and further processed. The freshly applied slurry must be protected from drafts and from sunlight.
5. Apply sealing slurry (see also point 4.2.)
The sealing slurry can withstand pressurized water up to 4 bar. The prerequisite is that in this case the slurry must be trowelled on, instead of painted on. Up to three layers are necessary for this (see Technical Data table). The sealing slurry should be applied on the inside up to 30-50 cm above the damaged area to ensure good sealing. If waterproofing from the outside is also intended, the slurry should be drawn up to 30-50 cm above the ground. The individual layers are applied one after the other without major waiting times (approx. 30 minutes or breakfast break length). Immediately afterwards, the renovation plaster can / must be applied.
6. Apply renovation plaster
The plaster is applied to the still wet sealing slurry, mixing a 30 kg bag with 5 L of cold clean water for about 5 minutes. Normally, only one layer is applied with a thickness of approx. 1 cm, in case of rooms particularly exposed to moisture, it is recommended to apply 2 layers, leaving the underlying layer rough. For execution and after-treatment of the plaster, the guidelines for plaster according to DIN 18550 apply:
Heat, frost, strong wind during and up to 24 hours after application must be avoided, as well as sufficiently long moisture retention must be ensured. In processable condition, the plaster is classified as corrosive and protective gloves and goggles must be worn.
As you can see, waterproofing from the inside is not witchcraft and can be done on your own. The preparations are basically the same steps as for other methods but the means then used are fundamentally different. With the crystalline sealing slurry you make the wall really and permanently tight, because the crystalline penetrates into the building substance and occupies the existing capillaries and pores and thus prevents the penetration of further moisture. This property remains in the building fabric in the future. With Injection Plus, you can achieve an effective horizontal barrier if required and create a balanced interior climate with the renovation plaster. The wall can "breathe" and the plaster creates a salt-free and dry surface without efflorescence, plaster spalling and condensation on the surface.


